Thursday, July 28, 2011

Cake #4=Ryley's Watermelon Picnic Cake

A dear friend's daughter saw my cakes and said she wanted me to make her a watermelon cake.  How could I say no to such an odd request from a kid?

Ryley's Watermelon Picnic Cake

The cake:
I used a vanilla cake recipe and added bright pink food dye to create the look of a watermelon's innards  when the cake was cut.
Watermelon:  Two 6" round pans 2" deep.
Picnic Table:  Two 9" round pans 2" deep.
Ground: One 12" round pan 2" deep.

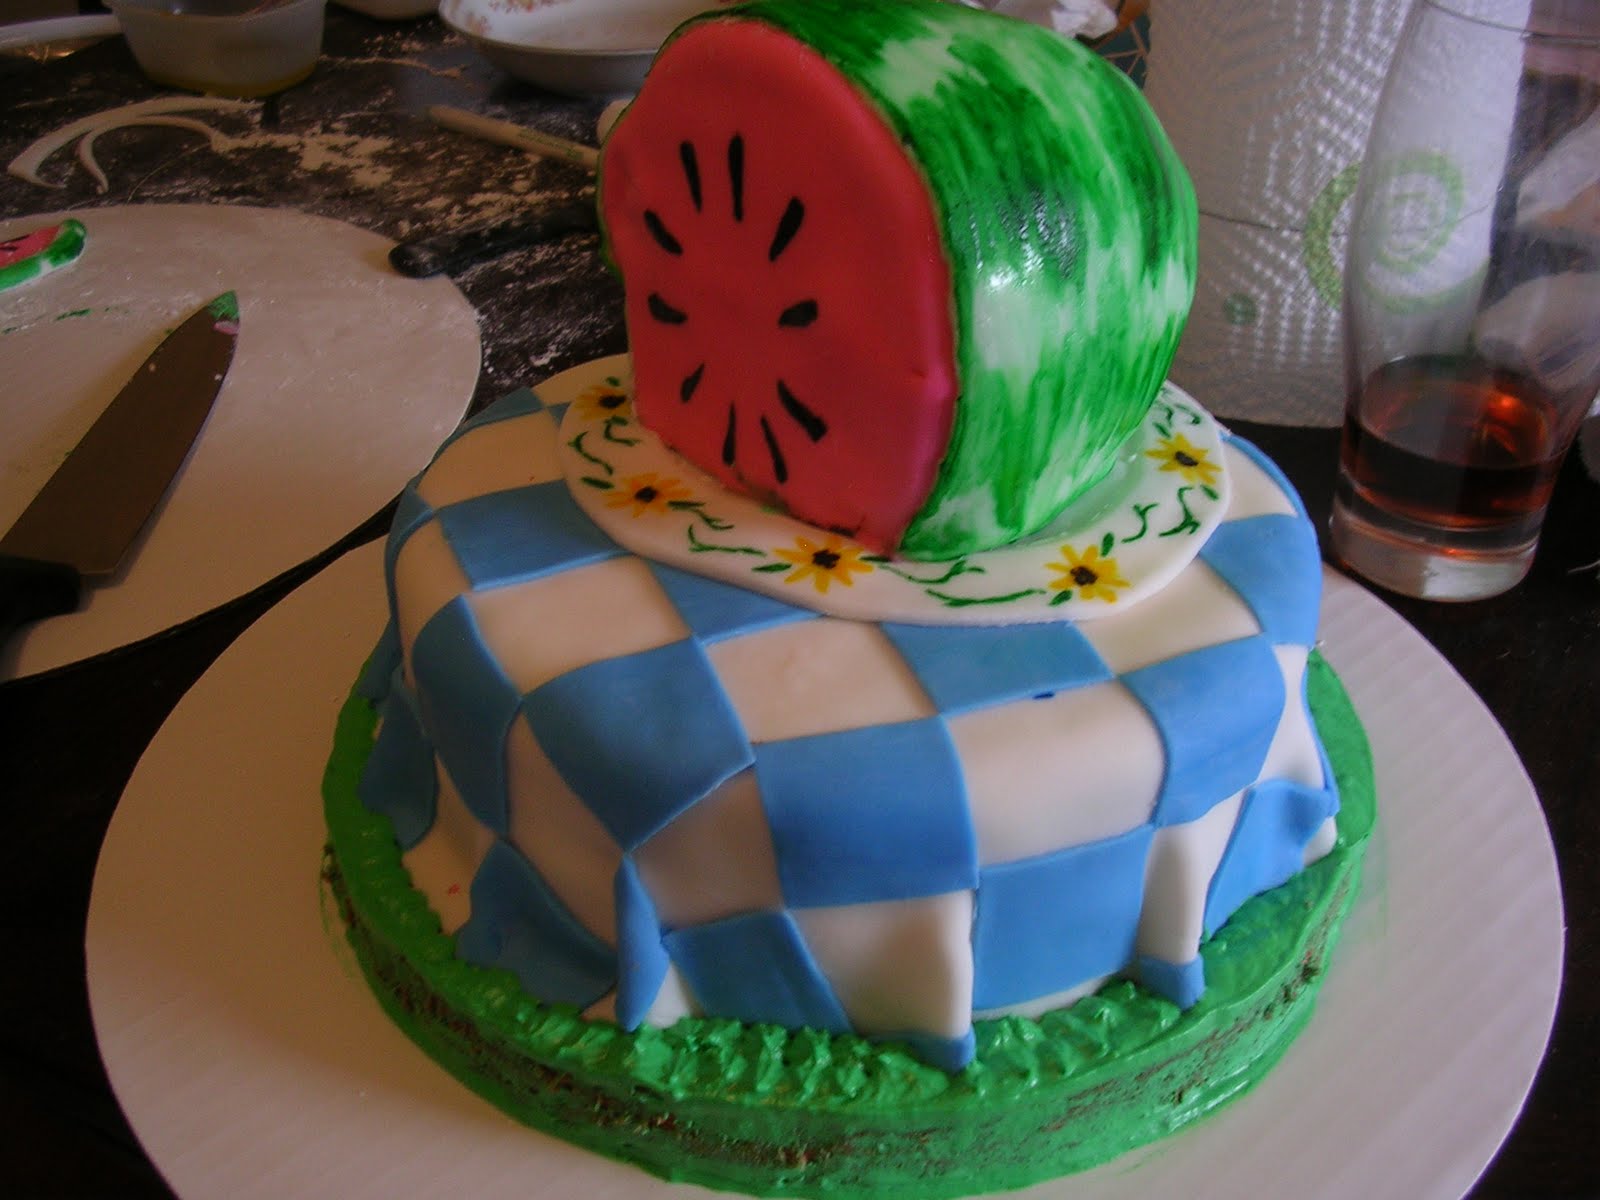
Once baked, I evened off the tops of the cakes with a large serrated knife.  I coated the bottom tier in butter cream frosting that I dyed green for the grass.  I coated the two 9" pans with just a white butter cream frosting.

I put a layer of frosting that I dyed pink to match the cake, between the two 6" pans before carving. I did this to keep the look of the watermelon's fruit cohesive.  Once I carved the shape, I crumb coated the watermelon with a very light green frosting, to create that second layer from the rind on the inside of the fruit.

Watermelon: shaped and crumb coated.

The Table Cloth:

I rolled out white fondant into a circular shape and smoothed it out over the 9" rounds.  I didn't smooth it out completely over the edge.  I used the edges to make a skirt for the table cloth and created some folds in the "cloth."

I then hand cut the squares to make the perfect picnic table cloth.  I made each square 1"x1" and placed them onto the white fondant to create the gingham pattern.  Hindsight is 20/20, and I realized after I did this that I should have placed the squares before I put the white fondant onto the cake.  It would have saved a ton of time.  But I learned from that.  

Gingham patterned table cloth.

The Platter:

I cut a circle for the platter and hand painted some sun flowers on it with food dye.  I used a food marker to create the vines as well.  

The Watermelon:

I covered this in a light green fondant and hand painted the darker green shading on the rind, and used fondant I dyed bright pink for the inside of the watermelon.  I then painted the seeds on with black food coloring. 

I used some of the extra fondant to make some slices and a picnic ant as well.

The Grass:

I dyed butter cream icing to a grass green and piped it onto the edges of the 12" round.  My mother gave me a great tip that helped a lot.  If you don't have an icing bag, take a Ziploc sandwich bag and push the icing tip through the bottom corner.  This will work as a great icing bag in a pinch and save some money.
I also placed some fondant flowers i cut out around the bottom of the grass to give the base a pretty border.  


Saturday, July 16, 2011

Cake #3-John Michael's Star Wars Cake

This was a special cake for me.  My first nephew John is turning six this year and it is the first time I will be able to attend one of his birthday parties.  Unfortunately, in the past, my job kept me from being able to make the trip to New Jersey where he and my brother, Michael, his wife Angela, and my youngest nephew James live.  (Retail doesn't allow for Saturdays off, especially when you are the boss.)  So, I thought, with my new passion for this cake decorating business, this would be the perfect opportunity for me to give my nephew buddy an awesome cake!  And of course, being the son of my brother, what kind of cake did I think John would want....?

A Star Wars cake of course!  

I started by making four characters from the Star Wars movies that I was always a fan of, the classics, out of fondant.
R2D2

Chewbacca

Darth Vader

And of course, Yoda.

The Cake:
Vanilla cake with butter cream frosting.
Two 12" round pans 2" deep.
Two 8" round pans 2" deep.

I found a great recipe for Vanilla cake online that I wanted to use for John's cake.  Vanilla is his favorite, so that was what he was going to get. 
Link to vanilla cake recipe:  http://www.food.com/recipe/magnolia-bakerys-vanilla-birthday-cake-and-frosting-139518 .  (Double the ingredients for this cake.)
Once they cooled, I covered one of the 12" cakes with the butter cream frosting and place the other on tops, and did the same with the 8" cakes as well.  I frosted each stack separately over the entirety of the cake, and let them sit in the refrigerator for a while to let the frosting settle.  

For the fondant covering, I dyed each layer with blue dye, but only kneaded the fondant about half way through, creating the marbleized look.  Once I smoothed the fondant over the cake, I cut out stars of various sizes to place over the bottom tier, to give it a fun look for a six-year old's birthday cake.


To fasten the two tiers together, I used a dollop of butter cream frosting in the middle of the bottom cake, and added 3 dowels I cut to fit the height of the cake.  The dowels weren't necessary, but since I will be traveling for a bit with this cake, I didn't want to take any chances.
I added the characters to the top and sides of the cake once we arrived at the party, because I was worried they would not hold on the two hour drive.
In the end, all that really mattered was that John had a great birthday and that he liked his cake.  He was thrilled with it all.  He even ate poor Chewy's legs off.  :)


Tuesday, July 12, 2011

Cake #2=Gabe's Misfits Drum Set Cake


I am glad to finally be posting my newest cake that my friend Jen asked me to do for her boyfriend, Gabe's, surprise birthday party.  After sneaking around poor Gabe's back for weeks, Jen and I figured out the perfect design for this cake.  She was a great help with sending me pictures of him with his drums and information on the Misfits, one of his favorite bands.

The idea:
Replica of Gabe's drum set with the logo of the Misfits skull on the bass drum.
Sounds easy... right...?

I started with the logo.  This was probably the most intricate part of the cake, but definitely the most fun for me.  I wanted to be able to transfer the design onto the fondant somehow, and then cut out the pattern from there.  But I couldn't get the right sizing, so I had to free hand it.

From there, I cut out the cymbals.  In order to get the brassy color, I dyed fondant with copper food dye and then "painted" them with a watered down brown color.  I used a food dye marker to write out the Zildjian logo on each one.  To get them to have the cymbal shape, I balled up a small amount of fondant and molded them around each one.  I allowed them to dry on there as well so they would keep their form.  I also used wooden dowels which I painted with a mix of black food dye and silver edible dust to create a metalic look for the cymbals to stand on.


Each small drum is a cupcake that I cut into a cylindrical shape, ( I cut one in half to create the snare drum.) and covered them in a teal fondant which I glazed with a watered down mix of black food dye and edible pearl dust.

The base drum is two 6" round pans 2" deep.  I pasted them together with chocolate icing and used the same process with the fondant that I used with the smaller drums.  For the heads, I used the Misfits logo on a black painted fondant circle and a plain black one for the back.  To make it stand, I used three wooden dowels which I placed vertically inside the two cakes and stuck them into the base.
(By the way, the time on the clock is A.M.)

The base of the cake was two 12x9" pans that were 2" deep.  I covered these with a brown tinted fondant and hand painted with brown food coloring a wood grain effect, to create a sort of stage for Gabe's drums.

From there I added a few details, such as sheet music, drum sticks and Gabe's favorite rug.  (Not pictured.)

There were a lot of hiccups along the way with this cake.  A lot of it had to do with the humidity we have been experiencing over the last few days.  The cymbals fell over because the support of the sheet cake wasn't enough, and the base drum almost collapsed into itself under its own weight.  But overall, it was a huge success. Jen and Gabe loved the cake.  Gabe even saved the base drum for himself to eat alone at home.  And I learned a lot along the way, of course.


Friday, July 1, 2011

July 12th

My next cake is due July 12th.  I will have pictures posted by July 11th.  Keep your eyes peeled!